Our new observatory!
Our new house has plenty of land, reasonably dark skies, and a reasonable homeowner’s association… so of course I had to try building an observatory! It may sound crazy, but it does offer a lot of advantages:
- I no longer have to set up my telescope, wait for dark, polar align it, and run a pointing model every night I want to image. That means more time with my family than out in the driveway!
- It’s a lot easier to take advantage of partly cloudy nights; normally I wouldn’t bother setting up on a night that was less than ideal, but when there is no setup required – why not try it?
- I don’t have to worry about unexpected rain as much, as the dome automatically closes up if it gets too cloudy or starts raining.
- I can control the dome and everything in it remotely, even if I’m traveling.
I decided on a dome instead of a roll-off-roof design, as they usually stand up better to hurricanes, and also block some of the wind and light while the dome is in use. Plus, there’s a certain aesthetic to it – you’ll never mistake a dome for a shed, and I don’t mind waving my nerd flag. I also decided on building it in our back yard instead of at some remote, darker site. The whole point was to avoid having to say to my family “sorry, I can’t watch that movie with you because I need to go set up my telescope” any more… and having to drive out to some remote place to troubleshoot problems would only make matters worse. The dome is for astrophotography, not visual observing, so pristine skies aren’t quite as important… I can make up for light pollution with longer exposures, up to a point anyhow.
A quick primer on how observatory domes work: in the center is a concrete pier, which has large bolts sunk into it. A “pier plate” attaches to those bolts, and you then in turn bolt your telescope mount to the pier plate, just like you would to a tripod. This creates a literally rock-solid support for your telescope. The pier should not be physically attached to the rest of the dome, to avoid vibrations from the dome affecting the pier and your telescope. There’s a gap between the pier and the concrete floor of the observatory, which I filled with sand. The observatory walls will support the “base ring” of the dome. A “dome support ring” rides on top of the roller wheels of the base ring, and the dome itself is bolted to the dome support ring. A shutter mechanism then completes the package, along with the motors and controllers to run the thing.
Concrete, by the way, is not an ideal material for observatory foundations, since it collects heat during the day and radiates it well into the night. This can degrade your “seeing” conditions a bit. But given the harsh weather conditions, insects, and potential for flooding here, wood construction seemed like a non-starter.
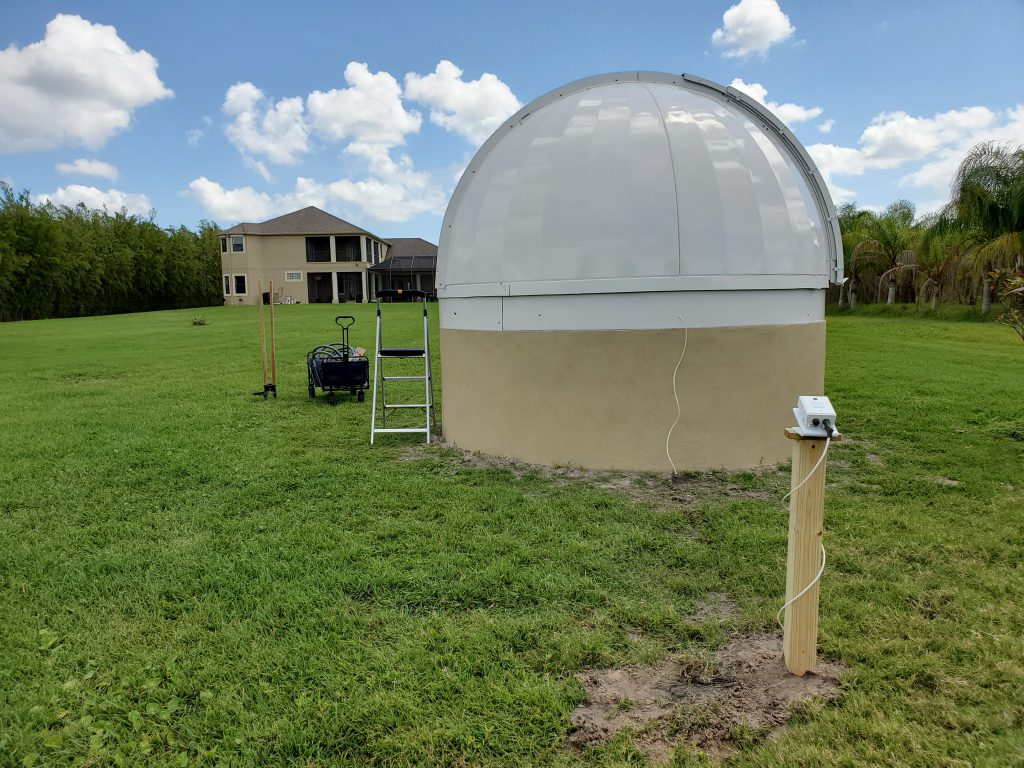
OK, back to making this thing real. The first step was securing HOA permission, which meant coming up with a general design and concept. My wife and I worked together to come up with something that would work into the landscaping we had planned for later on, and settled on a round concrete foundation (finished with stucco and paint) supporting a 10 foot dome.
The HOA covenants never anticipated anyone building an observatory, although it does have rules about outbuildings. So rather than submit an architecture review committee request out of the blue for this, I talked to the head of the committee on the phone ahead of time. This helped a lot, I think. The HOA’s main requirement was to match the building quality of the main house, which dictated concrete construction for the foundation and walls. I also planned to paint the walls to match the house. Staying within the rules wasn’t as hard as I feared.
Next I had to figure out what, if any, permits were needed. My own research suggested that outbuildings under 100 square feet don’t need one where I live, so it seemed we were good to go. After selecting a contractor to build the concrete foundation (ABC Concrete in Merritt Island, FL) I also checked with them, as they probably know more about local permits than I do. Technically what I was building was a concrete structure with a 3 foot wall, and apparently that doesn’t even qualify as a building… so on two different counts, no permit was required.
This is, however, hurricane country, and I wanted to be sure this observatory would be the last thing standing on my lot when the big one hits. What I asked the contractor to build was a 10-foot circular slab and wall, with a 12-inch concrete pier sunk 4 feet underground and 3 feet above ground. There is a one inch gap between the pier and the slab in order to isolate the pier from vibrations from the dome’s motion and from anyone walking around inside the dome. The foundation for the dome is constructed of cinder blocks, filled with poured concrete so I would have a solid wall to sink anchors into when securing the dome itself to the foundation. We also made sure no rebar was present in the upper few inches of the foundation to avoid any problems installing anchors, and also that no rebar was installed in the pier where the bolts for the mount would be sunk into. I decided to not build a doorway into the foundation at all; instead, you’ll enter through the dome slit using a stepladder. This eliminates a potential weak point in the foundation and a potential place for water and thieves to come in. As the dome will mostly be run remotely from the house, there shouldn’t be much need to go inside it. Not having a door is a minor inconvenience, but well worth the added security and weather tightness.
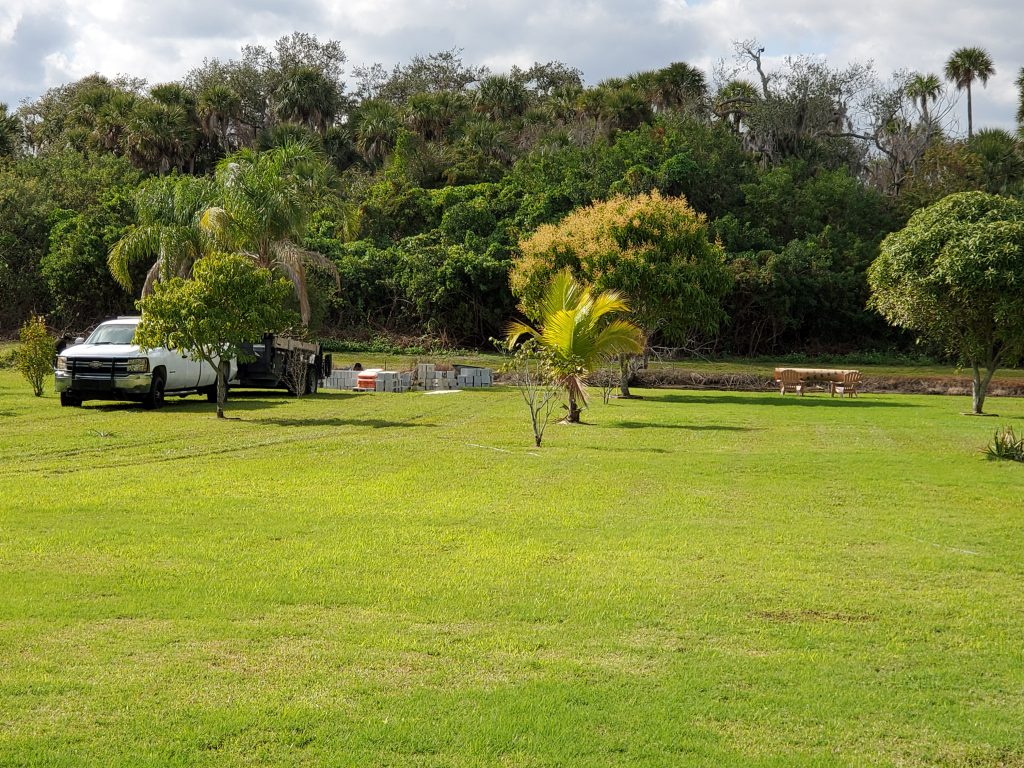
We had some tree removal done to ensure clear views from the observatory above 30 degrees all around, staked out where the dome would go, and also staked out where true North was relative to the dome’s center. This would be necessary for aligning the bolts sunk into the pier that would attach the mount to the pier. I used an app called “Solar Polar Alignment” to find true North during the day, and in the end it turned out to be very accurate.
I ordered the pier plate from Dan’s Piers that would connect my mount to the pier’s mounting bolts. The pier plates themselves have a lead time of a couple of months, but they can ship out those bolts right away so you can start constructing your observatory while you wait.
So it was full steam ahead. I told ABC Concrete it was go-time, and they were out a couple days later. That big tube on the chairs is a 12″ Sonotube that would be the form for the central pier for the telescope.
I impressed upon the workers the very tight tolerances required for the finished walls being circular and level to within a quarter inch. If your walls are not level and circular, it will be impossible to have a dome that rotates freely. Getting this right is hugely important and can make the difference between a smoothly operating dome and having to demolish everything and starting over. I also obsessed over the specs for the dome to make sure the wall would be just the right diameter and thickness to be able to securely attach the dome. You don’t want to be drilling out big holes for concrete anchors too close to the edge of the wall, so this requires some forethought. It turns out that an outer diameter of exactly ten feet works out well for a ten foot “home dome” from Technical Innovations.
Oh right, let’s talk about the dome itself, as it was time to order that as well. The lead time on domes is 2-3 months, so we had to get that going as soon as possible. I settled on a ten-foot “home dome” from Technical Innovations in Orlando. A couple of people in my local astronomy club were using their domes successfully, and there’s a lot to be said for buying local when it comes to something like this. The owner was able to just deliver it himself in his pickup truck, which saved a ton of hassle in shipping. If you start poking around online you will find a few people who do not have nice things to say about Technical Innovations, but when you dig into it you’ll find it’s because they didn’t have a round and level base to work from, and so they ran into all sorts of problems later. Again, that is hugely important, and not just for this brand of dome.
They are also reasonably priced, as domes go. So, I placed my order and deposit for a 10-foot Home Dome, its automation package (“Digital Dome Works”), an external entry key switch, a weather monitor system, and – most importantly – their “pre-assembly” service where they assemble the entire dome at the factory and test it before delivering it. This saves a ton of trouble figuring out where to drill holes and really simplifies assembly of a very large and unwieldy thing. Based on the advice of my club members, I also added on a third dome rotation motor and extra roller wheels to make sure it rotates reliably and smoothly. I also ordered a “circular skirt” which I ended up not using. Its lip ended up being a bit too narrow to work out, and it would have just acted as a sail for the wind. Plus the dome itself went right to the edge of the foundation, and a skirt to direct rain away wasn’t really necessary. I also ordered a switched set of AC outlets that I didn’t end up using; instead inexpensive “smart plugs” worked out better for what I wanted to do.
Although the list price for a 10-foot “home dome” is $7,995, my final invoice with all the extra stuff for automation and pre-assembly came to about $17,000. Without the circular skirt and remote power module that I ended up not needing, it would have been more like $15,500. Sounds like a lot of money, but I suspect my neighbors spent more than that on their boats.
If you want to start wrapping your head around how these domes work, I found Technical Innovation’s publication “At Home in a Dome” more helpful than anything.
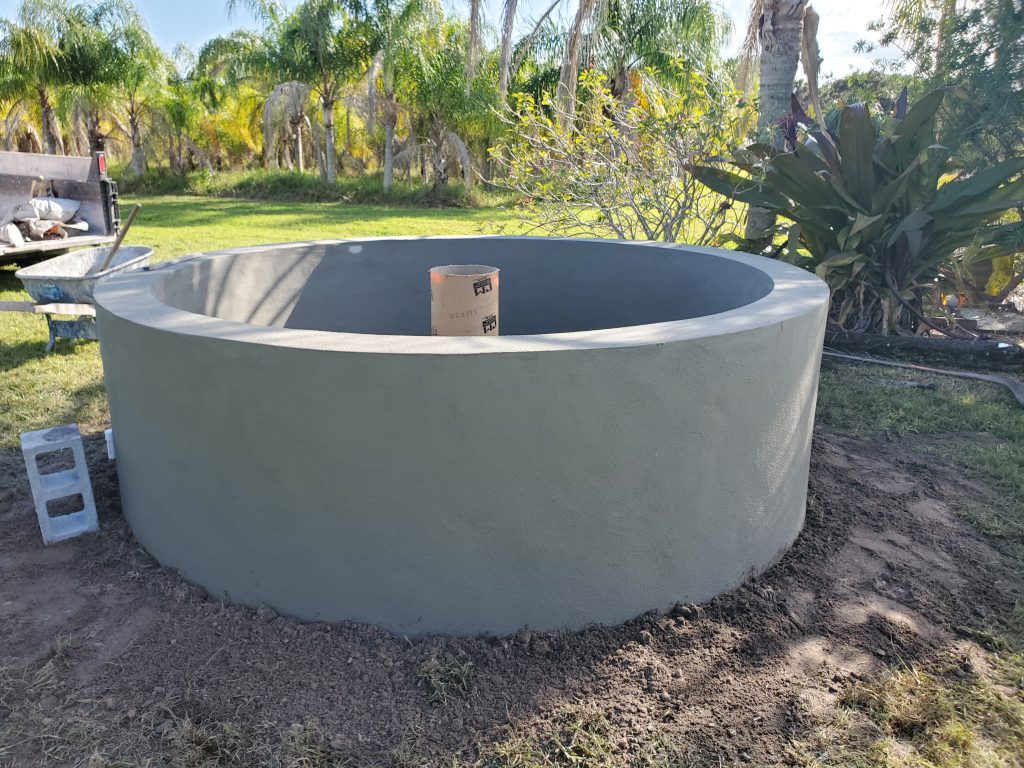
Anyhow, back to construction. The next thing the contractors did was pour the slab for the floor, leaving space for the pier in the middle:
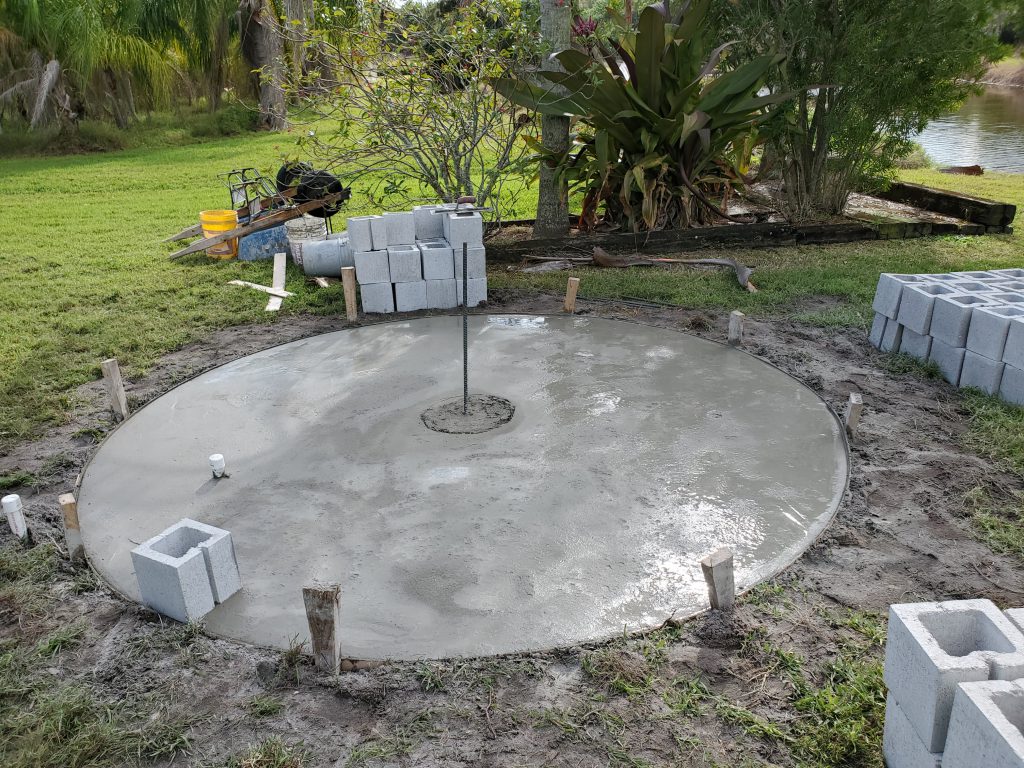
They used that bar in the middle to measure out a 5 foot radius for the base as precisely as possible, and they also ensured it was as level as possible. Note the PVC pipe… that is a conduit I added to allow running cables from the outside to the inside of the dome. In hindsight I would have used actual electrical conduit and not PVC pipe, as the corners in the PVC pipe were really too tight to allow easy fishing of cables. I ended up needing to cut the outside pipe in order to get at the cable I was trying to get through it later on. Ultimately the electricians I hired to run power to it drilled their own holes through the foundation, and that pipe ended up being used as a drain for a dehumidifier.
Things moved quickly; up went the walls and the form for the pier:
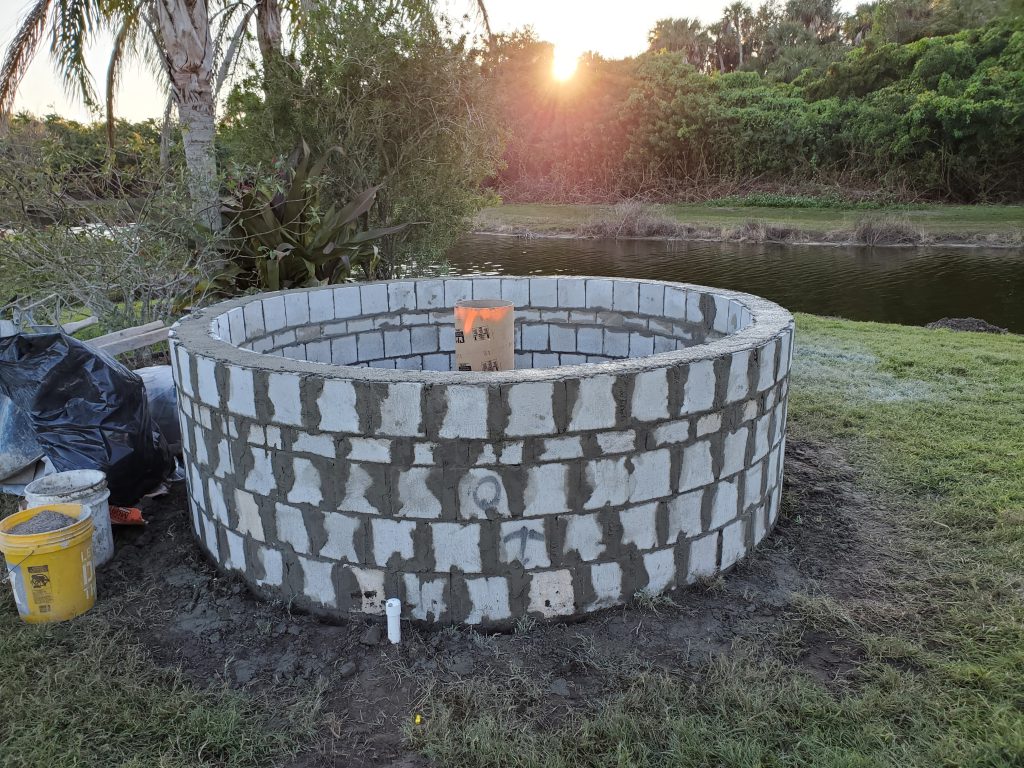
Note that the centers of the blocks are filled with concrete, to provide a solid anchor for the dome later on.
At this point, disaster almost struck. They still had some time left in the day, and proceeded to pour the pier. But thanks to pandemic postal delays, I hadn’t yet received the J-bolts from Dan’s Piers that needed to be sunk into the wet concrete of the pier! Fortunately, I was able to catch them before it started to cure, and they were able to scoop out enough concrete for me to position those bolts a few days later when they finally arrived.
They did some finish work while we were waiting for those bolts to come in:
When the bolts finally arrived, I had to construct a plywood template for their ultimate placement on the real pier plate:
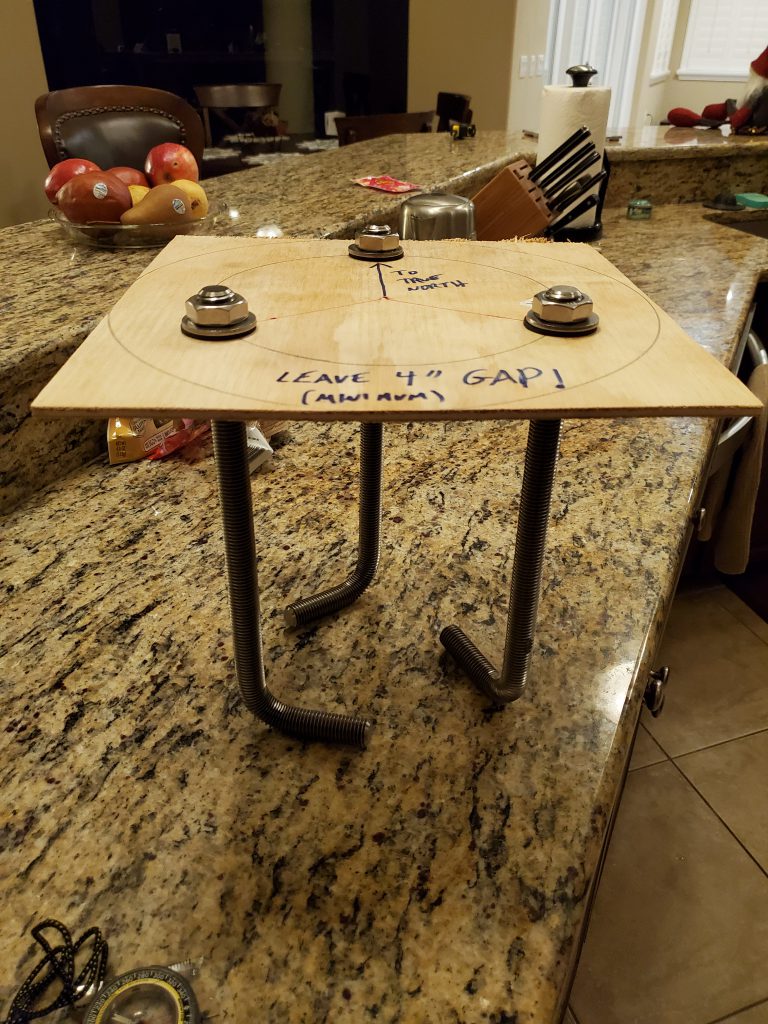
These bolts need to be sunk into the tube facing North, which is why I staked out true North earlier relative to the pier center. Also, a 4″ gap should be left between the top of the concrete pier and the pier plate. I called back the concrete guys and let them know we were ready to finish pouring the pier:
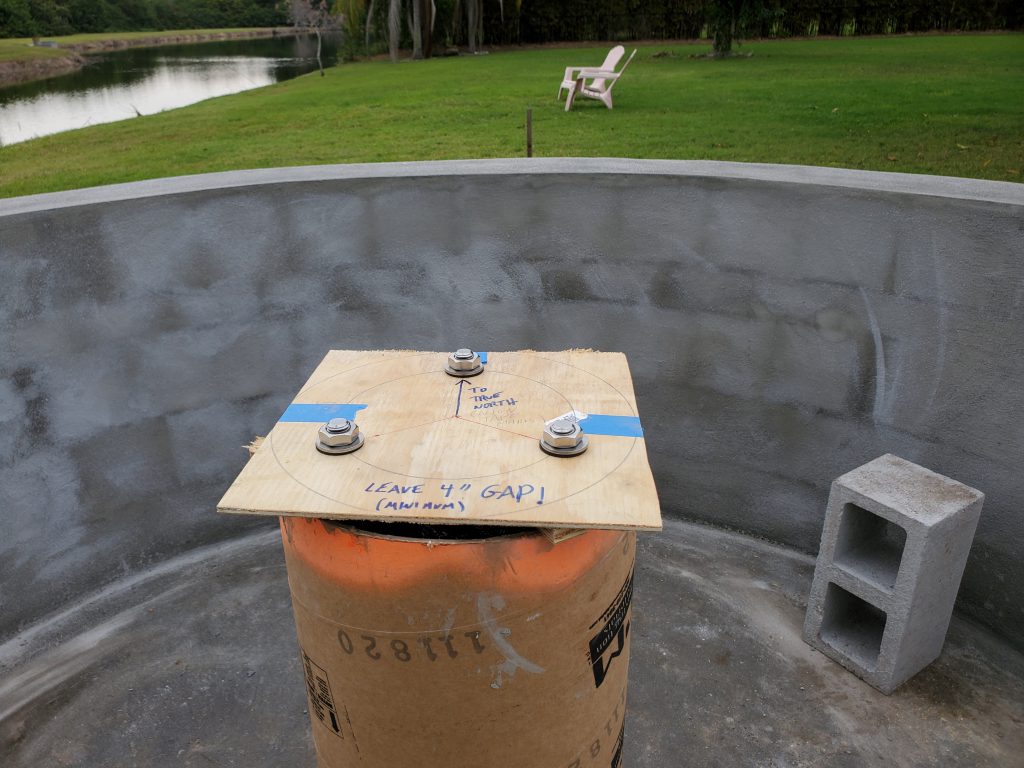
It was important that no rebar was in the way of these bolts, and that we left that 4″ gap between the top of the concrete and the top of the form. And, we made sure the template was pointing North as accurately as possible. The pier plate does allow some adjustment if you’re off a little, but you really don’t want to screw this up. Once that concrete sets, there’s no turning back.
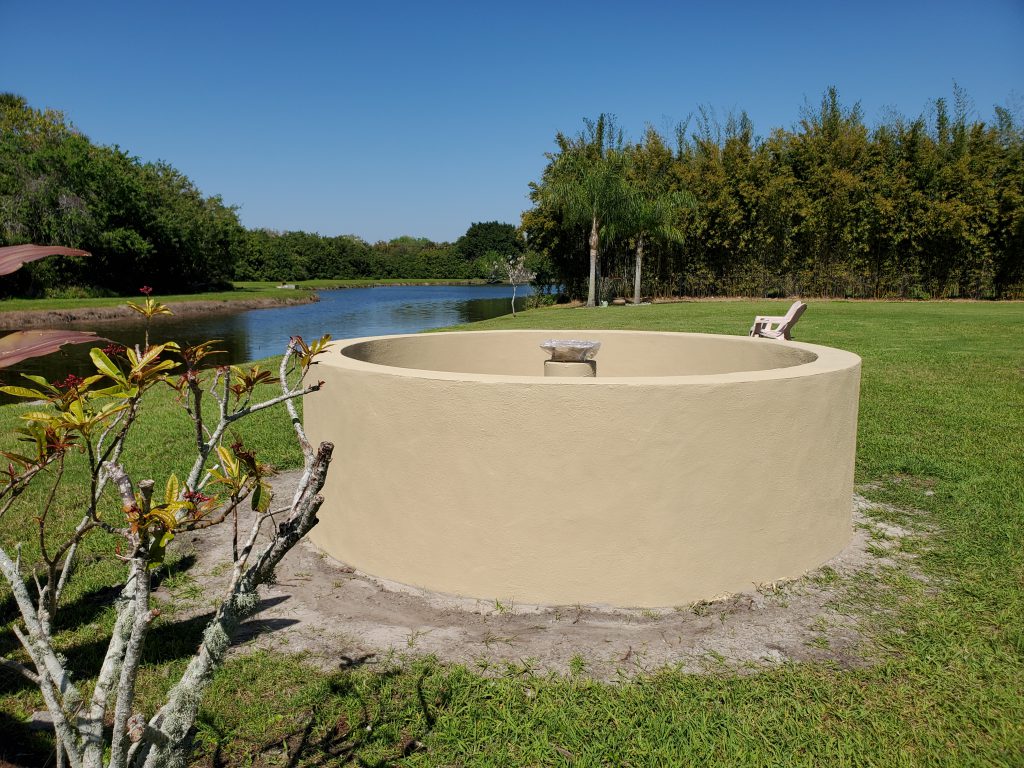
After allowing a month for the concrete to cure, they came back to seal and paint it to match the house:
Total cost for all the concrete work was about $7,000.
The next event was the pier plate arriving. Fortunately my plywood template was close enough, and the J-bolts fit into the pier plate without much trouble:
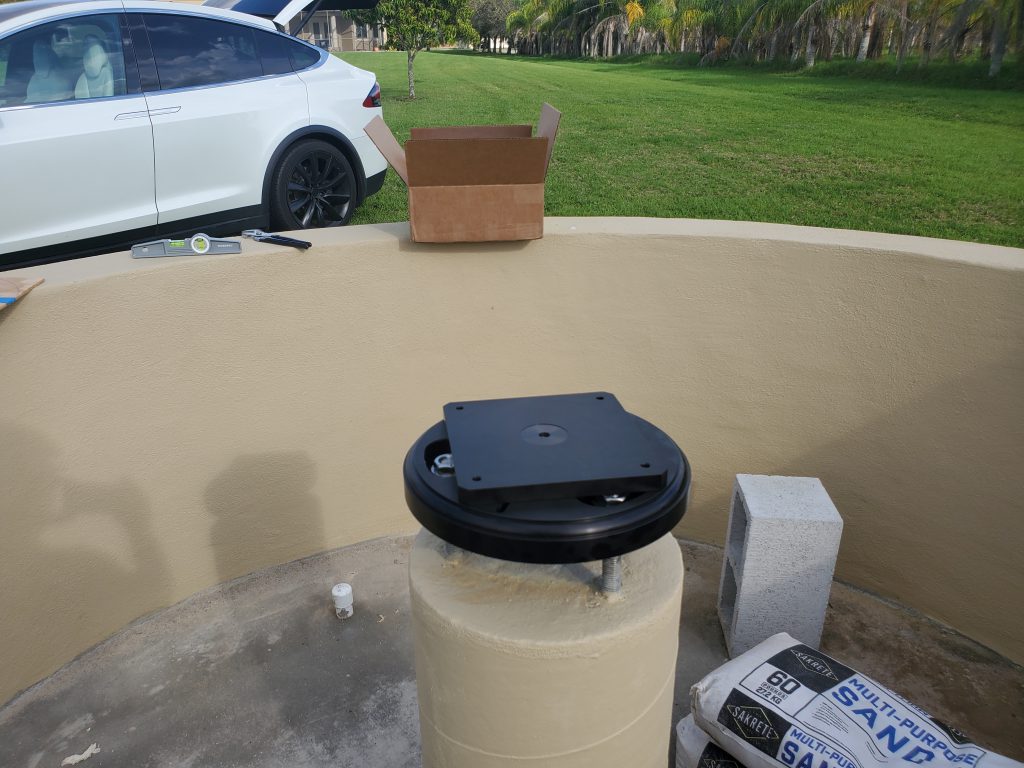
Dan’s pier plates have that big circular 12″ base ring, and a plate that bolts onto it that is specific to your mount. This makes it relatively easy to switch mounts later on if you want to; you just need a new top plate in that case.
A couple weeks later, the dome itself arrived! Jerry from Technical Innovations and one of his helpers drove it over from Orlando. I did a dry run of assembly in my garage, where it would be easier to deal with mistakes and learn how it all goes together. These dome pieces act like sails in the wind, and you want to minimize your assembly time outdoors as much as possible.
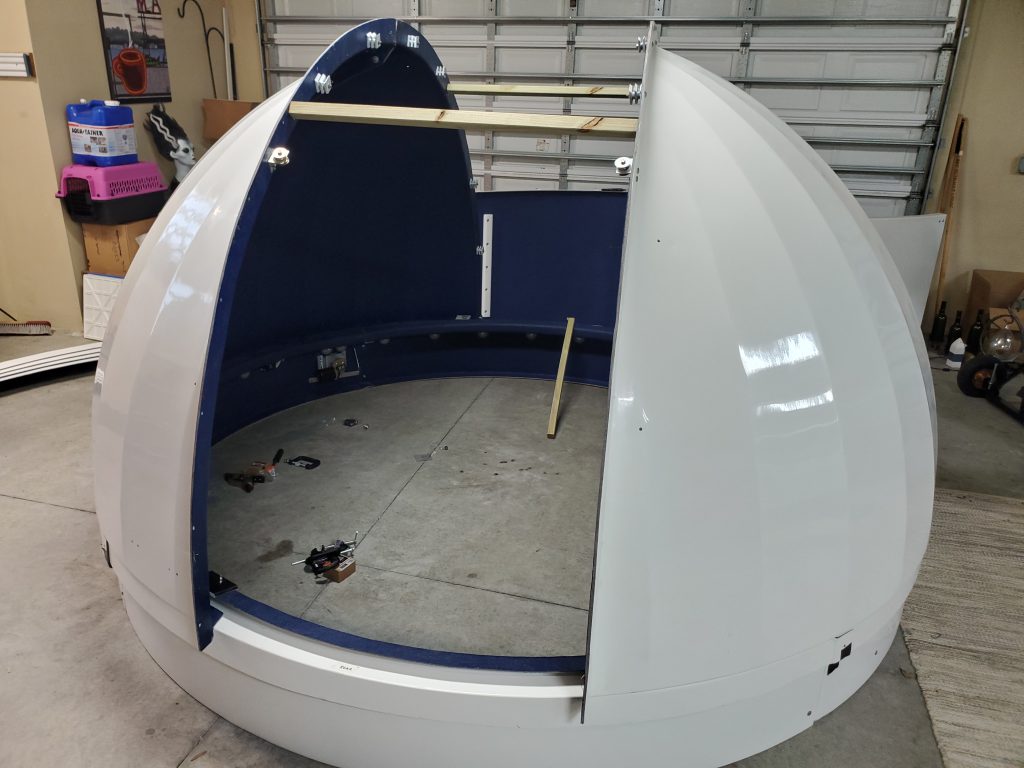
It was good that I did this in the garage, as there were a few screws that needed replacing and a few things that didn’t fit quite right that I had to deal with. Have lots of quality C-clamps on hand; that helps a lot. I also learned a few things the hard way, and it was a lot less disastrous for the dome to fall off the base ring on the floor of my garage than it would have been on top of the 3-foot foundation outside.
Confident in my understanding of how to put this thing together without destroying it in the process, the next step was attaching the base ring to the foundation:
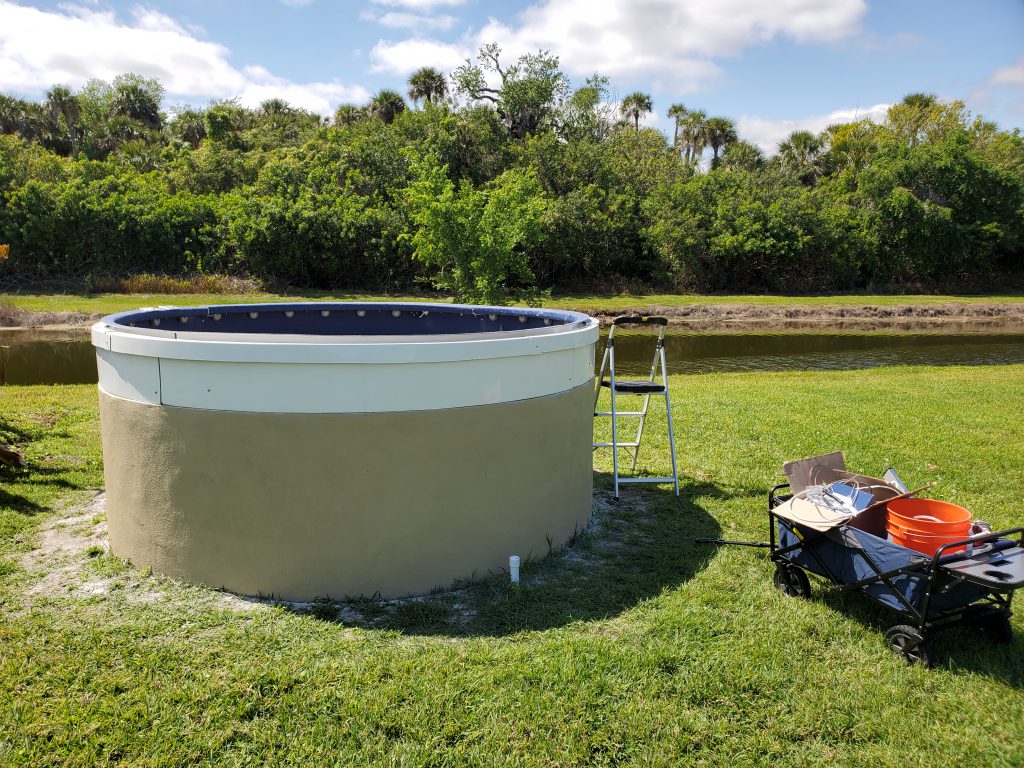
This is tricky, as you need to sink huge concrete anchors and huge lag bolts with huge washers to attach the ring to the foundation, while keeping the ring perfectly round and perfectly level. I measured the diameter at several points with a tape measure until it was round, and used a water level to confirm the ring was level at several points. I then outlined the ring with a sharpie so I could reposition it later, drilled pilot holes where the anchor bolts should go, moved aside the ring, drilled holes for the anchors with a hammer drill and carbide bits (and a portable generator,) and finally attached everything with the bolts and washers. I cannot stress enough how important it is for this base ring to be round and level; do not rush this. It also saved a ton of work by having the foundation level to start with; this avoided the need to use shims to try and level out the ring after the fact.
Then I patiently waited for a day with calm winds, and with the help of my wife and daughter moved the dome halves up onto the base ring and bolted them down to the “dome support ring” on top of the base ring. Do not fool yourself into thinking you can do this yourself. It is a 3-person job.
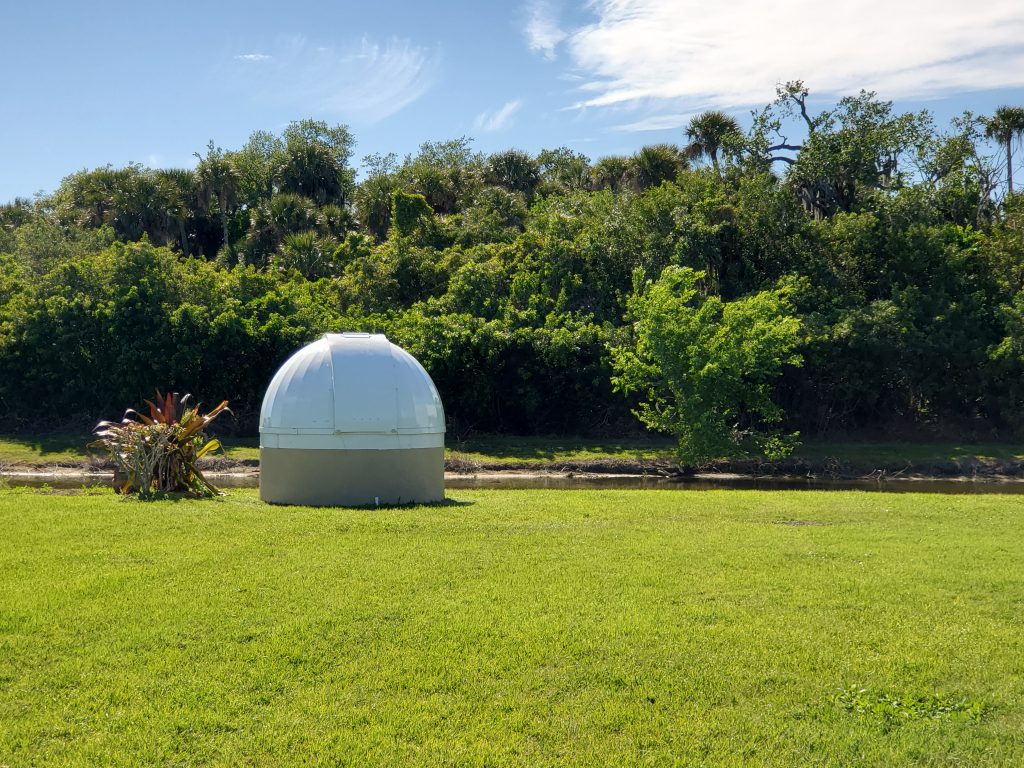
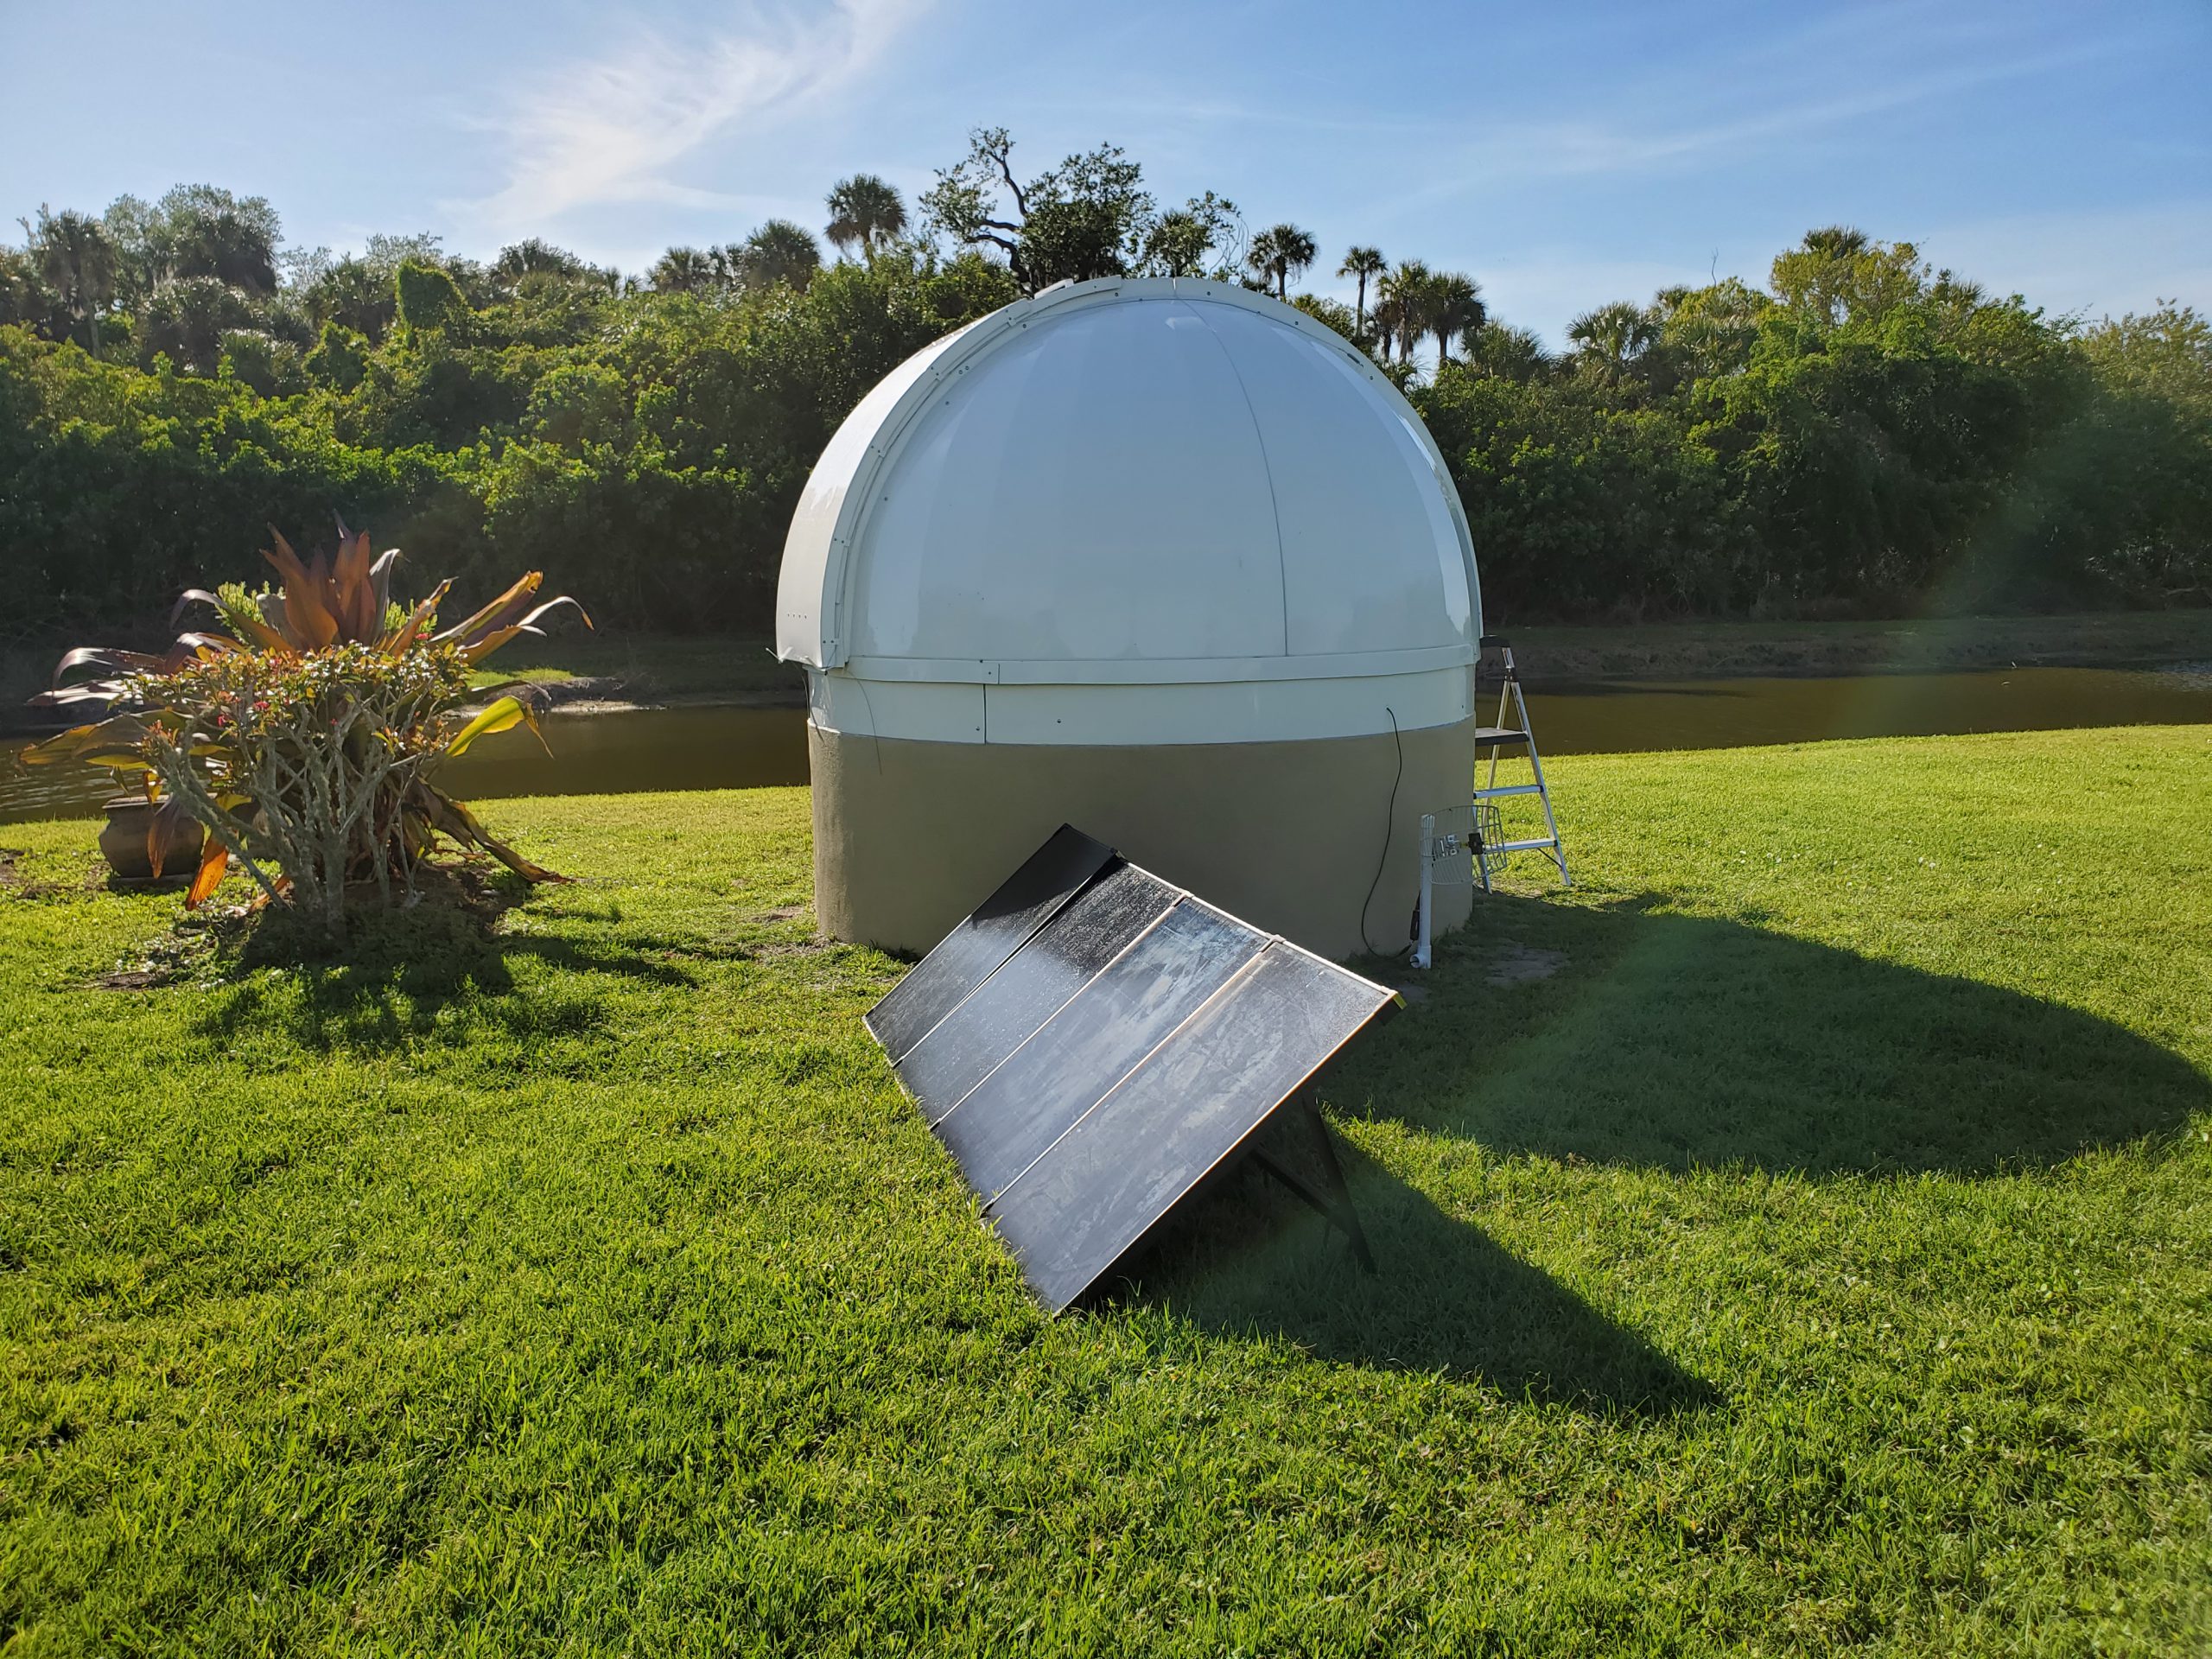
Hey, it looks like an observatory now! I quickly sealed it up with clear silicone caulk that came with the dome, as there are some gaps where rain can get in otherwise. I’m still finding and patching leaks in spots where the caulking didn’t totally fill the gap, but eventually it’ll be weathertight. It is remarkable how water finds its way through the tiniest crack.
But the work was just beginning to make it operational. Can’t do much without power and network access. My electrician was booked out for a month, so I installed temporary solar power from our emergency gear and a little wifi antenna in order to boost the signal from my house:

It then took a couple of days to install the dome rotation motors and the shutter motors. The shutters were the hardest part by far. The rollers for the shutter cables weren’t in quite the right place, and I had to space some of them out with washers before it would operate reliably. I also had to re-string how the cable attaches to the front shutter in order to make it fall where it needed to go. Even with the “pre-assembly” service, the way the dome fit together for me was just different enough from how it was in the factory to cause some issues. Just took a bit of determination to work through them.
Next up was installing the cloud and rain sensor. Turns out you can’t just bolt it to the side of the dome; it needs to be away from it a bit. So, I had to construct a little platform on a pressure-treated deck post for it, as well as an underground conduit for the cable:
Finally, in came the equipment!
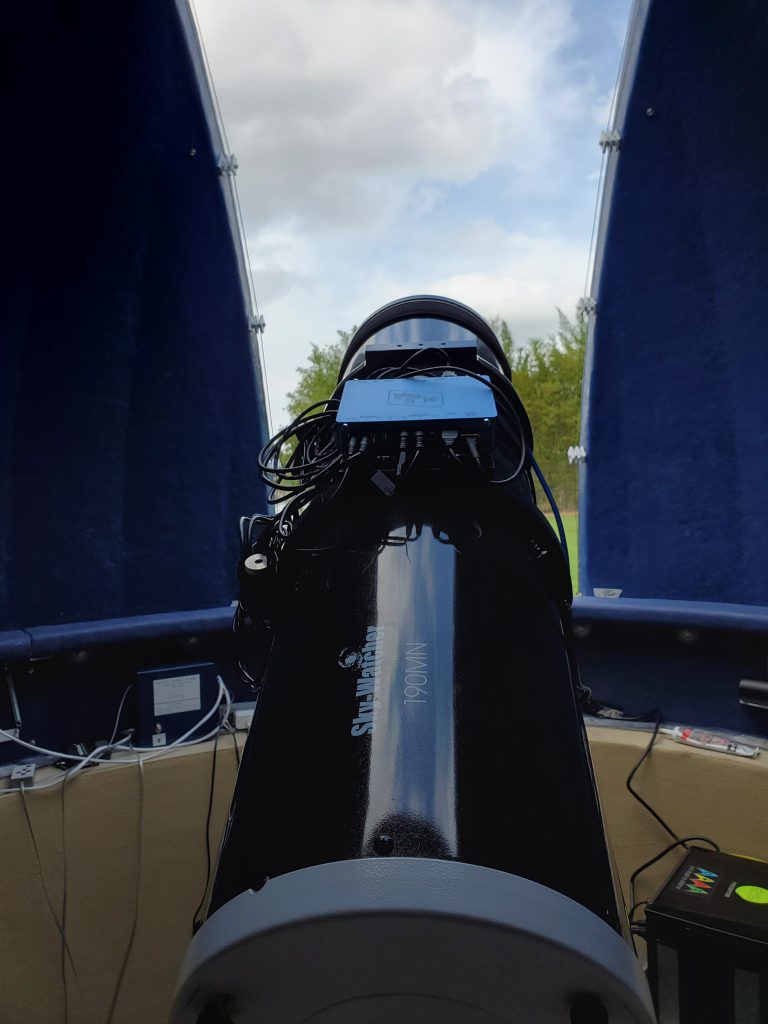
And now it was just a matter of calibrating everything, and figuring out how the software for the dome and weather sensor integrates with my other software. On the next somewhat clear night, I accurately polar aligned the mount, and hopefully I won’t have to do that again for a long time!
Now we wait for a clear night and some actual imaging! My 1400 watt-hour battery there is just barely enough to power it all overnight, so I might stick to shorter live stacking sessions until that electrician gets out here to dig a trench and pull AC power and fiber to the observatory. But it works!! We’re calling it “Heimdall’s Observatory,” which is a reference to Norse mythology (and the Thor movies from Marvel.) We might theme the interior accordingly 🙂
I hope this long story is useful for others who may undertake a similar project. If you know me, don’t hesitate to contact me with any questions you might have.


Hi Frank,
Bob Masters here in Gardnerville Nevada just outside Lake Tahoe. Thanks for sharing your PD10 construction story. I just placed my order 2 days ago for the PD10 and 3 wall rings. Lead time is now 4 months which is no problem since we don’t usually get snow until the end of November. Unfortunately due to my location I am paying a lot more for shipping than you had to. I also paid for the pre-assembly service thinking everything would then bolt together correctly. So I was surprised at your comments about stuff not lining up. Do you mind elaborating a little bit for me? Do you think it was possibly due to the fact you were using a concrete base rather than their dome rings. I purposely ordered the dome rings instead of building my own building to hopefully eliminate any screw alignment problems. Also I like your comment about the third motor as I was not aware of that and they didn’t mention it to me. Wonder if I should add the additional motor to my order?
All the best,
Bob
I suspect that the dome quads can get warped in between pre-assembly and when you assemble it, which might lead to them not bolting together easily. I had to go buy some larger bolts in order to get them together in a few spots. I have found that over time the spacers I had to add to get the shutter cables to sit properly on their rollers seem to have become less necessary as the dome has settled. Figuring out the shutter was the hardest part, although it wasn’t too hard. I’m not sure if pre-assembly includes them fully installing and testing the motorized features; I suspect it doesn’t. But if I could figure it out, anyone can.
I do think the third motor is a good investment. Rotation has been rock solid with it, and it’s not something that’s easily added later on if you find you do need it. Since you have the Pro-Dome you shouldn’t need extra rollers though.
Frank,
First let me say you have executed a great design for your home observatory and thanks for documenting it so well. I noted that you are using Digital Dome Works. I’m wondering how you find it.
I bought a place in New Mexico just a year ago and it came with an Ash Dome that had used DDW, however the seller hadn’t used it (I’m the third owner and the dome was built by the original owner). The seller didn’t have any documentation. My goal is to get a telescope in the dome this fall and get the DDW working. The motors all work well. It will be a matter of getting it to work, and work with the SkyX and eventually Voyager (I am new to astrophotography and as such have no experience with SGP or N.I.N.A. and I’ve concluded that I will go with Voyager (have friends who have it, and who like it)).
Any comments, tricks, or warnings about DDW would be greatly appreciated.
Kevin
Sorry it took me so long to see this comment! DDW isn’t perfect, but it works… usually. Its software hasn’t been updated in a very long time, but it does the job. I use the ASCOM driver in conjunction with the Dome add-on in TheSkyX. Voyager does seem to be gaining popularity but if you have a Paramount TheSkyX makes sense.
Most of my problems with DDW have been with the shutter, but that’s specific to the design of the HomeDome and I don’t think you’d have those issues with an Ash Dome. The belts wear out on the DDW motors and that will probably be the main thing to keep an eye on. If a belt breaks or gets out of its groove it can lead to things seizing up at a bad time. The wheels on the motors also don’t last forever, so I’d recommend having some spare belts and wheels on hand. TI will sell them to you if you ask. If it’s been sitting there unused for years I would definitely check the condition of the belts.